11/02/2019

River Table Hacks: 4 Steps for Success

River tables have become immensely popular in the last 2 years. 

river-table Half Baked Art and Dillweeds Custom Wood

There are so many videos, images and tutorials on social media! But, very few with solid information. Here are some simple, but essential, steps to successfully pouring an epoxy resin river table.

TOOLS & MATERIALS    

Extech moisture meter

Moisture meter
Solvent-safe foam roller
Chip brush
Spray bottle
99% Isopropyl alcohol
Clean, lint-free cloth
Heat gun

DRY 

All wood substrates (surfaces) must be completely dry before adding epoxy resin. Kiln dried wood is best for epoxy application. This will also prevent the wood from absorbing moisture from a humid environment. For naturally dried wood, the moisture level should be 12% or lower.  Use a moisture meter to get an accurate reading. 
Trapped moisture will eventually expand and cause your epoxy to bubble up from underneath. Combined with heat, it will soften and the bond between the wood and resin will fail. The bottom line is never put epoxy resin on wood that has not been properly dried to 12% or below

CLEAN  
spray-bottle-and-clean-lint-free-cloth

For best results, you should apply resin on a squeaky clean surface, free from dust, debris and oils. Oils are deposited on the surface from your skin. (Every time you touch the wood, your fingers leave an oily residue behind). Depending on the type of wood you have chosen to use, the steps to achieving a clean surface will vary. 
If you have chosen a cradled birch wood panel, it should be sanded and "ready-to-use".  All you need to do is spray the entire surface with 91% isopropyl alcohol and wipe clean with a soft, lint-free cloth.
If you are using a live edge slab, you will most likely have a lot of work to do before you are ready to clean. Use a air hose to clear all the dust off of the wood. Using 91% isopropyl alcohol, spray and wipe clean with a lint-free cloth. Repeat until the surface is completely clean. (Denatured alcohol works too)

SEAL   
apply-seal-coat-with-foam-roller-for-epoxy

All epoxy resins should be applied in two coats: a SEAL COAT and a FLOOD COAT.  Applying a thin coat of epoxy, with a solvent-safe foam roller or chip brush, to the entire area that will be covered with resin.  Here are four reasons to seal:
  1. Sealing prevents outgassing of air bubbles into the flood coat of epoxy. 
  2. Sealing prevents color bleeding. Thirsty wood will soak up epoxy, changing the appearance of the wood and any color used will "bleed" into the wood. 
  3. Sealing adheres objects or debris into place and prevents contamination of the flood coat.
  4. Sealing will make your mold or form watertight and eliminate any possible leaks when pouring the flood coat.
Although one seal coat may be sufficient, a second seal coat may be needed. You should have a glossy finish across the entire wood surface after your seal coat(s) dries.
Do not worry about air bubbles in the seal coat. Just apply and let dry! Your flood coat will cover imperfections. You do not need to sand between coats, as long as you apply the next coat within 72 hours. I do suggest cleaning the area with alcohol between coats.

FLOOD  
Pouring-epoxy-resin-flood-coat-HalfBakedArt

This is the main layer of epoxy resin for your project. It is applied generously and thoroughly to the entire area at once. This thick layer will "self-level" and produce the perfect glass-like finish of epoxy resin. Always read and follow the manufacturer's directions, as every kind of epoxy resin is different in several ways.
Depending on the type of application, more than one flood coat may be required. Some casting epoxies are limited to an inch deep, while others should not be poured less than 2 inches deep.

FINISH COAT

An optional clear top coat of epoxy is recommended when you want the professional finish. A clear coat adds depth and dimension while it amplifies the contrast of colors in the flood coat. This top coat should be a standard epoxy (not casting) which is more viscous, self-levels to 1/8 inch, cures faster and to a harder, more durable finish. This same resin makes for a better seal coat as well.  This coat should be poured on and allowed to self-level. If it is necessary to "spread" this coat, use a notched trowel spreader to assure the right thickness. 

AVOIDING & REMOVING AIR BUBBLES  
using-heat-gun-to-remove-air-bubbles-from-epoxy-HalfBakedArt

Air bubbles are normal, in small amounts, and often present in liquid epoxy resin after mixing the correct amount of Part A & Part B.  Let's look at what causes air bubbles- Temperature, moisture, excessive whipping, outgassing from the substrate, surface and/or embedded objects- all of which are avoidable.
  • Epoxy (Part A and Part B) should be acclimated to room temperature before using, as well as your wood. Room temperature should be 70 -78°F. (74° ideal). 
  • Water is kryptonite to liquid epoxy resin! It will ruin your epoxy mixture and project. A dehumidifier is a great idea. Moisture contamination can come from unexpected sources. ex: Humidity level, sweat, condensation from air conditioner, damp wood, wet paint, adding water-based pigment (food coloring, water color, tempura paint, etc...) utensils, buckets, mixing cups or anything with a drop of water
  • When mixing, hand mixing is best. Keep your mixing stick on
    mixing epoxy-resin-by-hand-HalfBakedArt
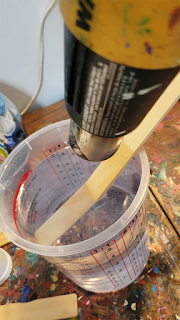
    the bottom of the cup to prevent whipping air into the mixture and scrape the sides, bottom and stick repeatedly during the mixing process. If you do have some bubbles after mixing, let the bucket/cup sit for 30 seconds and use a heat gun to zap the layer of bubbles off the top before pouring. Also, add the epoxy mixture one third at a time using a heat gun to remove bubbles from each layer
  • For general de-gassing, I strongly recommend a heat gun, held 4-6 inches above the epoxy resin, continuously moving in a sweeping motion across the whole area. You can repeat this after 30 minutes if needed. 
  • Outgassing was covered in the seal coat section. This applies to any and all objects that will be covered with resin. (rocks, pebbles, shells, coins, photos, dried flowers, etc...

Choosing a low viscosity epoxy is essential for the flood coat. If you follow the steps outlined here, you won't have a problem with air bubbles. Try using a high viscosity epoxy for sealing and/or top coating for better coverage and faster curing.


Ruler measures inches and centimeters


CHOOSING THE RIGHT EPOXY

Every brand manufactures multiple resins, each is made for a specific application. In addition, there are many types of resin, again, each one designed for a different use. Be sure you select an epoxy resin made for your type of project. The wrong epoxy will not work! I recommend FlowCast by EcoPoxy.

If you are making a river table (pouring a layer 1/2 inch or deeper) you MUST use a casting resin. These are made to pour deeper than 1/4 inch and are strongly suggested. (recommended depth will vary greatly, read the directions). Deep casting resins are formulated for a slow exothermic process. This is essential to prevent the epoxy from overheating during its exothermic process. On the contrary, epoxy resin must reach the peak exotherm temperature to cure to its full strength. Therefore, using fans to "cool" curing resin is a bad idea. 

There are several brands of casting epoxies available. Each is designed for different uses/applications.  Casting jewelry, turning blanks and pouring river tables are very different applications! Also, it's important to take into consideration the total volume (mass) you will pour. Exceeding recommended volumes is very risky.

Regardless which epoxy resin you decide to buy, please read ALL manufacturers directions before using. Know the minimum and maximum depth that can be poured, as well as, total volume. 

10/08/2019

8 Ways Music Affects Your Brain


8 Surprising Ways Music Affects and Benefits Our Brains

I reposted this wonderful article by Belle Beth Cooper several years ago. But after revisiting it today, I decided it was worthy of a re-post. 
aka HalfBakedArt
originally posted 2015


Related image
I’m a big fan of music, and use it a lot when working, but I had no idea about how it really affects our brains and bodies. Since music is such a big part of our lives, I thought it would be interesting and useful to have a look at some of the ways we react to it without even realizing.

“Without music, life would be a mistake” – Friedrich Nietzsche

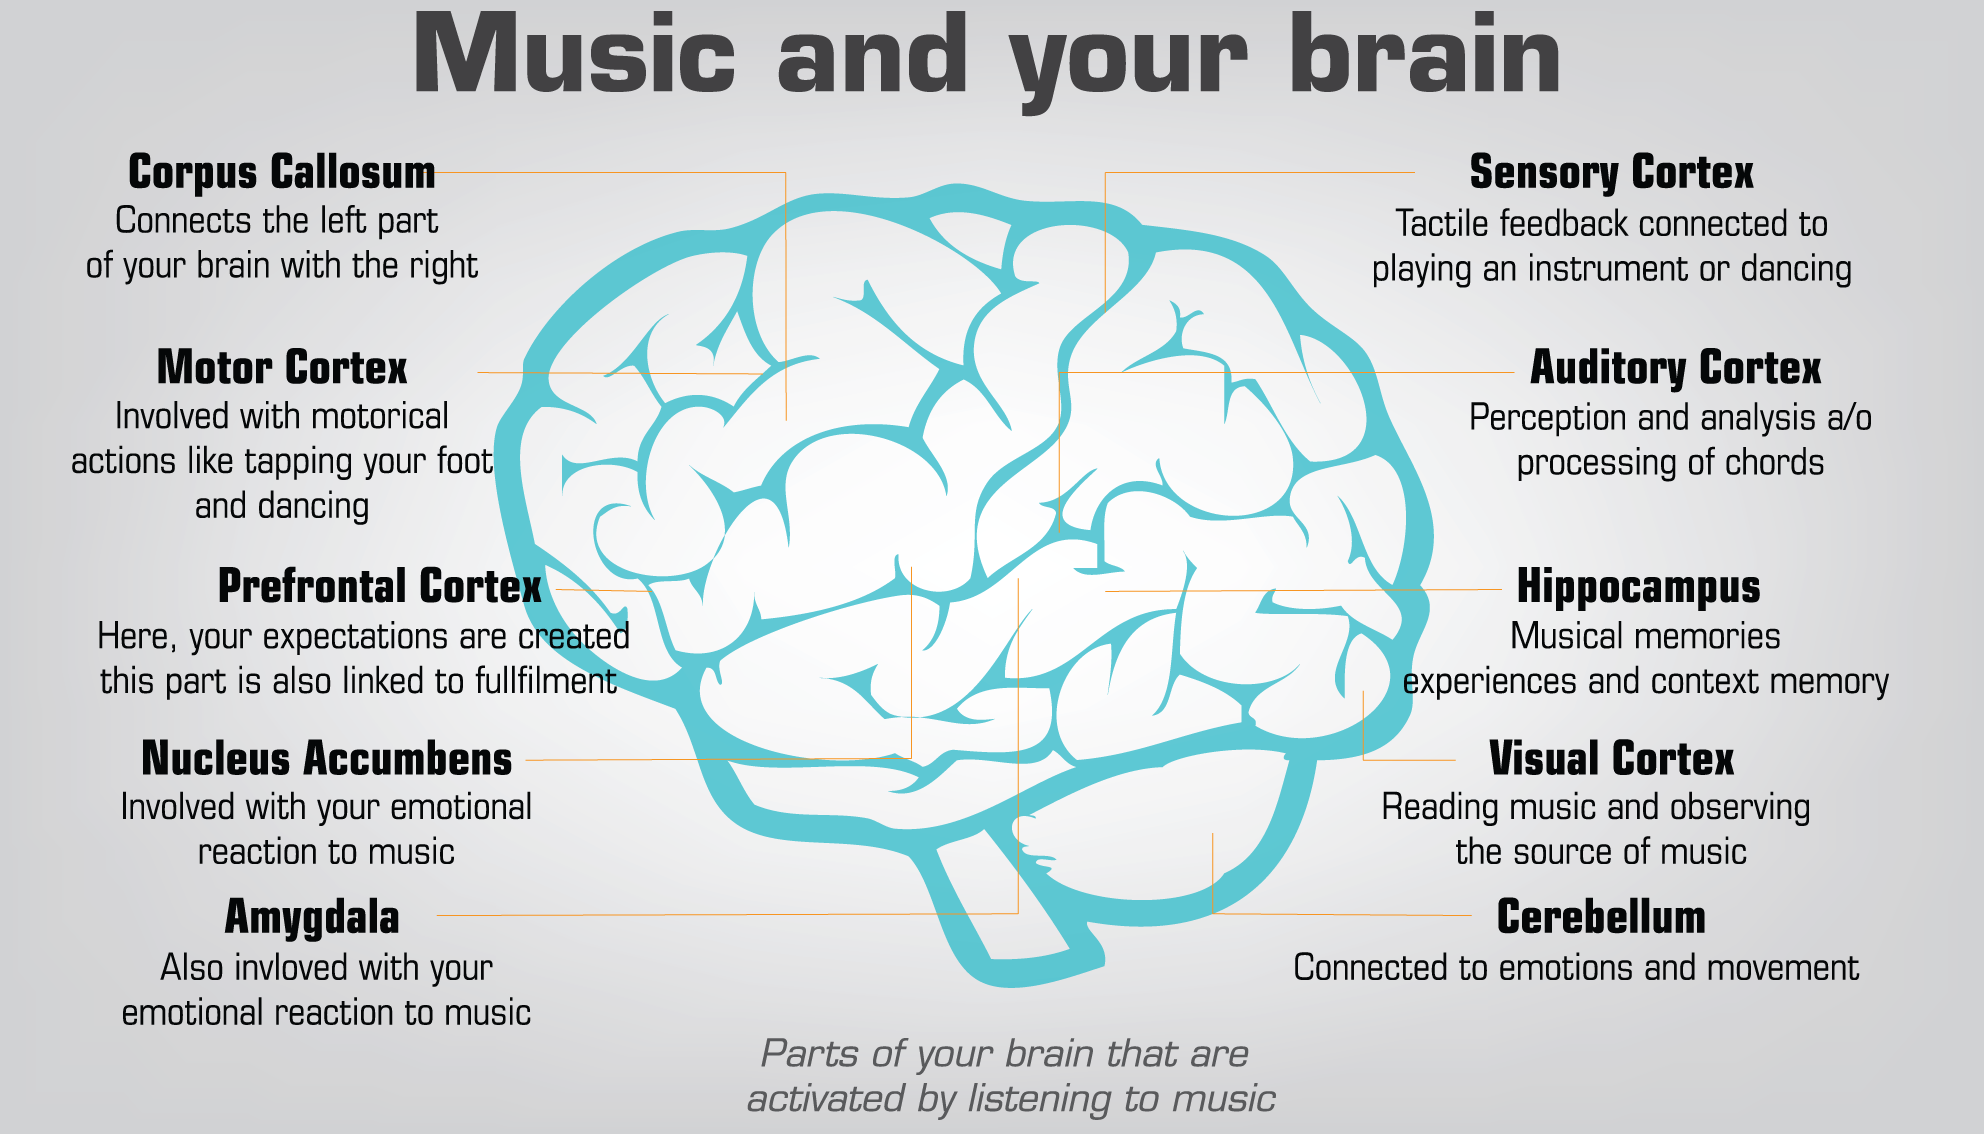
Of course, music affects many different areas of the brain, as you can see in the image below, so we’re only scratching the surface with this post, but let’s jump in.

1. Happy/sad music affects how we see neutral faces:

We can usually pick if a piece of music is particularly happy or sad, but this isn’t just a subjective idea that comes from how it makes us feel. In fact, our brains actually respond differently to happy and sad music.
Even short pieces of happy or sad music can affect us. One study showed that after hearing a short piece of music, participants were more likely to interpret a neutral expression as happy or sad, to match the tone of the music they heard. This also happened with other facial expressions, but was most notable for those that were close to neutral.
Something else that’s really interesting about how our emotions are affected by music is that there are two kind of emotions related to music: perceived emotions and felt emotions.
This means that sometimes we can understand the emotions of a piece of music without actually feeling them, which explains why some of us find listening to sad music enjoyable, rather than depressing.
Unlike in real life situations, we don’t feel any real threat or danger when listening to music, so we can perceive the related emotions without truly feeling them—almost like vicarious emotions.

2. Ambient noise can improve creativity

We all like to pump up the tunes when we’re powering through our to-do lists, right? But when it comes to creative work, loud music may not be the best option.
It turns out that moderate noise level is the sweet spot for creativity. Even more than low noise levels, ambient noise apparently gets our creative juices flowing, and doesn’t put us off the way high levels of noise do.
The way this works is that moderate noise levels increase processing difficulty which promotes abstract processing, leading to higher creativity. In other words, when we struggle (just enough) to process things as we normally would, we resort to more creative approaches.
In high noise levels, however, our creative thinking is impaired because we’re overwhelmed and struggle to process information efficiently.
This is very similar to how temperature and lighting can affect our productivity, where paradoxically a slightly more crowded place can be beneficial.

3. Our music choices can predict our personality

Take this one with a grain of salt, because it’s only been tested on young adults (that I know of), but it’s still really interesting.
In a study of couples who spent time getting to know each other, looking at each other’s top ten favorite songs actually provided fairly reliable predictions as to the listener’s personality traits.
The study used five personality traits for the test: openness to experience, extraversion, agreeableness, conscientiousness and emotional stability.
Interestingly, some traits were more accurately predicted based on the person’s listening habits than others. For instance, openness to experience, extraversion and emotional stability were the easiest to guess correctly. Conscientiousness, on the other hand, wasn’t obvious based on musical taste.
Here is also a break-down of how the different genres correspond to our personality, according to a study conducted at Heriot-Watt University:

To break it down, here is the connection they have found:

  • Blues fans have high self-esteem, are creative, outgoing, gentle and at ease
  • Jazz fans have high self-esteem, are creative, outgoing and at ease
  • Classical music fans have high self-esteem, are creative, introvert and at ease
  • Rap fans have high self-esteem and are outgoing
  • Opera fans have high self-esteem, are creative and gentle
  • Country and western fans are hardworking and outgoing
  • Reggae fans have high self-esteem, are creative, not hardworking, outgoing, gentle and at ease
  • Dance fans are creative and outgoing but not gentle
  • Indie fans have low self-esteem, are creative, not hard working, and not gentle
  • Bollywood fans are creative and outgoing
  • Rock/heavy metal fans have low self-esteem, are creative, not hard-working, not outgoing, gentle, and at ease
  • Chart pop fans have high self-esteem, are hardworking, outgoing and gentle, but are not creative and not at ease
  • Soul fans have high self-esteem, are creative, outgoing, gentle, and at ease
Of course, generalizing based on this study is very hard. However looking at the science of introverts and extroverts, there is some clear overlap.

4. Music can significantly distract us while driving (contrary to common belief)

Another study done on teenagers and young adults focused on how their driving is affected by music.
Drivers were tested while listening to their own choice of music, silence or “safe” music choices provided by the researchers. Of course, their own music was preferred, but it also proved to be more distracting: drivers made more mistakes and drove more aggressively when listening to their own choice of music.
Even more surprising: music provided by the researchers proved to be more beneficial than no music at all. It seems that unfamiliar, or uninteresting, music is best for safe driving.

5. Music training can significantly improve our motor and reasoning skills

We generally assume that learning a musical instrument can be beneficial for kids, but it’s actually useful in more ways than we might expect. One study showed that children who had three years or more musical instrument training performed better than those who didn’t learn an instrument in auditory discrimination abilities and fine motor skills.
They also tested better on vocabulary and nonverbal reasoning skills, which involve understanding and analyzing visual information, such as identifying relationships, similarities and differences between shapes and patterns.
These two areas in particular are quite removed from musical training as we imagine it, so it’s fascinating to see how learning to play an instrument can help kids develop such a wide variety of important skills.
Similar research shows this correlation for exercise and motor skills in the same way, which is also fascinating.

6. Classical music can improve visual attention

It’s not just kids that can benefit from musical training or exposure. Stroke patients in one small study showed improved visual attention while listening to classical music.
The study also tried white noise and silence to compare the results, and found that, like the driving study mentioned earlier,silence resulted in the worst scores.
Because this study was so small, the conclusions need to be explored further for validation, but I find it really interesting how music and noise can affect our other senses and abilities—in this case, vision.

7. One-sided phone calls are more distracting than normal conversations

Another study focused on noise, rather than music, showed that when it comes to being distracted by the conversations of others, phone calls where we can only hear one side of the conversation are the worst offenders.
After a survey showed that up to 82% of people find overhearing cell phone conversations annoying, Veronica Galván, a cognitive psychologist at the University of San Diego, decided to study why these are such a pain.
In the study, participants completed word puzzles while one half of them overheard one side of a mundane phone conversation in the background. The other half of the volunteers heard the entire conversation as it took place between two people in the room.
Those who heard the one-sided phone conversation found it more distracting than those who heard both people speaking. They also remembered more of the conversation, showing that it had grabbed their attention more than those who heard both sides and didn’t remember as much of the discussion.
The unpredictability of a one-sided conversation seems to be the cause of it grabbing our attention more. Hearing both sides of a conversation, on the other hand, gives us more context which makes it easier to tune out the distraction.
Then again, as we’ve explored before, getting distracted is often not such a bad things for various reasons.

8. Music helps us exercise

Back to music again, and we can see that just like silence doesn’t help us to be more creative or better drivers, it’s not much use when we’re exercising, either.
Research on the effects of music during exercise has been done for years. In 1911, an American researcher, Leonard Ayres, found that cyclists pedaled faster while listening to music than they did in silence.
This happens because listening to music can drown out our brain’s cries of fatigue. As our body realizes we’re tired and wants to stop exercising, it sends signals to the brain to stop for a break. Listening to music competes for our brain’s attention, and can help us to override those signals of fatigue, though this is mostly beneficial for low- and moderate-intensity exercise. During high-intensity exercise, music isn’t as powerful at pulling our brain’s attention away from the pain of the workout.
Not only can we push through the pain to exercise longer and harder when we listen to music, but it can actually help us to use our energy more efficiently. A2012 study showed that cyclists who listened to music required 7% less oxygen to do the same work as those who cycled in silence.
Some recent research has shown that there’s a ceiling effect on music at around 145 bpm, where anything higher doesn’t seem to add much motivation, so keep that in mind when choosing your workout playlist. Here is how this breaks down for different genres:
 Image result for music and your brain
Now if we team up these different “tempos” with the actual work-out we’re doing, we can be in much better sync and find the right beat for our exercise. If you match up the above with the graphic below it should be super easy to get into a good groove:
So in the same way that exercising makes us happier, it’s not surprising that music adds significantly to our work-out success.
What have you noticed about how music affects you? Let us know in the comments.
Related image

The Secret to Epoxy Resin Success

The Secret to Epoxy Resin Success: part 1
Preparing for a Resin Pour


The secret to creating great resin art is PREPARATION! Working with epoxy resin is not as easy as it looks. It is not hard, or difficult to learn, unless you are unprepared! Professional resin artists know that this


Epoxy resin: Part A and Part B


Once combined, the clock starts ticking. Literally! You have a short amount of time (pot time) to mix, apply the liquid resin, and de-gas, before it becomes to thick to work with. There are other rules too, so setting yourself up for success is essential to making beautiful resin art and executing an effective epoxy resin pour.


Here are some checklists to guide you through setting up a successful work area.


CHOOSING A WORK SPACE:


  • Large indoor work area (studio, basement or spare room)

  • Optimal temperature and humidity (temperature controlled)

  • Clean and free from dust and debris

  • Sufficent lighting (natural and artificial)

  • Electrical outlets and drop cords (for heat gun)

  • Flat surface for your artwork (table, sawhorses)

  • Additional area for mixing (side table)

  • Trashcan(s)


Optional:


  • running water

  • space heater

  • air cleaner

  • exhaust fan

  • dehumidifier

  • tape measure

  • stool

  • journal and pen

  • storage space

  • shelving


SUPPLIES & MATERIALS:


  • Plastic dropcloths or plastic sheeting to cover all surfaces

  • Apron, smock or painting clothes

  • Hat or hair band

  • Paper towels (lots)

  • Disposable gloves (vinyl or nitrile)

  • Painter's tape (Frog or Blue) wide enough to protect the edge

  • Level

  • Plastic cups (several sizes and lots)

  • Plastic measuring and mixing container (16 oz, 32 oz or larger)

  • Craft sticks or Paint mixers for large pours

  • Rubber spatulas, plastic spreaders or disposable brushes

  • Exact-O knife, tweezers or toothpicks (to remove debris)

  • Implements or utensils for texture or effects (comb, notched trowel

  • Spray bottles

  • Colors (paints, inks, pigments, powders, dyes, tints)

  • Additives and applicators (oils and eye droppers)

  • 91% isopropel alcohol, (denatured alcohol or acetone*)

  • Epoxy resin (EcoPoxy or brand made for artist)

  • Your project or artwork


**If you can't close off the work area during the curing process then use a large cardboard box to cover your artwork. (longer, wider and taller than your project)


Pick A Substrate (surface)


Wood, canvas, tile, paper, metal, acrylic, and so many more possibilities. Epoxy resin can be applied to dozens of surfaces or materials. Get creative with your selection! If you're a resin artist (or epoxy resin painter), like I am, consider using wood panels instead of stretched canvas. If you are coating a stretched canvas with epoxy resin, use rigid cardboard as support to


prevent the canvas from sagging and making the resin pool in the center. *I have also used smaller stretched canvases that fit perfectly under my large canvas project.

*example: (2) 16 x 20" canvases fit under a 24 x 48


PREPPING:


After you have chosen your substrate, there's a little more preparation before you pour your epoxy resin.

TAPE: Tape the back of your artwork with painter's tape to protect it from drips.

CLEAN: Make sure it is completely clean and dry. I suggest you spray the surface with alcohol and wipe clean to make sure it is completely dust-free each and every time you are about to pour.

SEAL: Seal your project, and/or any objects to be coated, with a light coat of resin or a spray-on or brush-on sealant. Epoxy resin is the best choice, using a paint brush (correct size, disposable) foam roller, or spreader, apply a thin quick coat to seal in any air, debris or dust that will definitely contaminate the second coat (flood coat) of resin. This step is so important if you are going to have a perfect finish!

PRIME: If you are going to make a resin art painting, it's a good idea to prime your surface with a thick coat of white paint. Although it is optional, a white surface will show truer, brighter colors. If you are going to leave any negative space, this will provide a smooth background.

**note:I always prime my wood panels with a coat of white house paint, the all-in-one kind, before I seal it with epoxy resin. This gives me a perfect surface to create my artwork and makes the finished painting flawless.


Stress Free Epoxy